Beyond Sprouts: The Microgreen Moment
Microgreens are young vegetable greens harvested just after the first true leaves appear, typically 7-21 days after germination. Unlike sprouts, which include the root, seed, and shoot, microgreens consist only of the stem and leaves. This distinction impacts both their flavor and texture.
While sprouts were once the standard for adding freshness, microgreens provide a more pronounced flavor and satisfying crunch. They are not entirely new, but they are currently very popular. Consumers are increasingly focused on maximizing nutrient density and proactively supporting their health, shifting from merely avoiding illness to actively building wellness.
This trend shows no sign of slowing. While exact future growth is hard to quantify, microgreen availability and demand are expected to expand. Restaurants are incorporating them more, and home gardening remains popular. They offer a manageable way for people to connect with their food and feel good about what they're eating.
Nutrient Powerhouses: What Makes Them Special?
Microgreens are packed with nutrients. Research from Iowa State University shows they often contain 4 to 40 times higher concentrations of vitamins and minerals compared to their mature counterparts. The exact levels vary by variety, but you generally get a more concentrated dose of nutrients.
A study published by PMC highlighted the substantial amount of Vitamin E found in many microgreens, which contributes to overall body functioning. They are also excellent sources of Vitamin C, Vitamin K, beta-carotene, and essential minerals like potassium, iron, and zinc. Most varieties are especially rich in potassium, iron, and zinc.
This concentration of nutrients leads many to classify microgreens as a 'functional food' – offering health benefits beyond basic nutrition. They are considered a tool to promote health and potentially prevent disease. While early research is promising, there is limited evidence supporting microgreens as a treatment for specific diseases. More extensive studies are needed to confirm these benefits.
The average moisture content of microgreens is around 94.68%, while germinated seeds have a much lower moisture content of 38.58%. This high water content contributes to their refreshing taste and texture. The nutritional profile changes based on the specific plant and growing conditions.
- Vitamin C: Supports immune function.
- Vitamin E: Acts as an antioxidant.
- Vitamin K: Important for blood clotting and bone health.
- Beta-carotene: Converted to Vitamin A in the body, supporting vision and immune function.
- Potassium: Helps regulate blood pressure.
- Iron: Essential for carrying oxygen in the blood.
- Zinc: Supports immune function and wound healing.
Nutrient Comparison: Microgreens vs. Mature Vegetables (Approximate Values)
| Vegetable/Microgreen | Vitamin C (mg/100g) | Vitamin E (mg/100g) | Beta-carotene (µg/100g) | Vitamin K (µg/100g) | Percent Difference in Nutrient Concentration |
|---|---|---|---|---|---|
| Radish Microgreens | Approximately 25-50 | Data not readily available | Data not readily available | Data not readily available | Significantly higher Vitamin C than mature radishes |
| Mature Radish | Approximately 4-10 | Trace amounts | Data not readily available | Data not readily available | Lower Vitamin C concentration |
| Broccoli Microgreens | Approximately 40-70 | Data not readily available | Data not readily available | Data not readily available | Substantially higher Vitamin C than mature broccoli |
| Mature Broccoli | Approximately 89 | Approximately 0.8 | Data not readily available | Approximately 101 | Varies; microgreens may have a higher concentration of certain vitamins |
| Pea Shoots Microgreens | Approximately 20-40 | Data not readily available | Data not readily available | Data not readily available | Potentially higher Vitamin C than mature peas |
| Mature Peas | Approximately 13 | Approximately 0.1 | Data not readily available | Data not readily available | Lower Vitamin C concentration |
| Sunflower Microgreens | Data not readily available | Approximately 1-2 | Data not readily available | Data not readily available | Contain a substantial amount of Vitamin E, contributing to improved body functioning |
| Mature Sunflower Seeds | Data not readily available | Approximately 3.5 | Data not readily available | Data not readily available | Vitamin E content present |
Illustrative comparison based on the article research brief. Verify current pricing, limits, and product details in the official docs before relying on it.
Since I'm going to be working in one place for a bit, I'm able to begin growing microgreens again.
— Real Trucker Jake Logan (@jakelogan) July 2, 2025
Broccoli, peas, sunflower, wheatgrass, and radishes.#microgreens #nutrition pic.twitter.com/JHlhZ4CUPY
Popular Varieties and Their Flavors
Choosing the right microgreen involves flavor as much as nutrition. Different varieties offer vastly different tastes, opening up culinary possibilities. Radish microgreens, for instance, have a spicy, peppery kick – perfect for adding a bite to salads or sandwiches. Broccoli microgreens have a milder, slightly sweet flavor reminiscent of mature broccoli.
Sunflower microgreens are nutty and slightly sweet, making them a great addition to stir-fries or as a snack. Pea shoots offer a fresh, sweet pea flavor and delicate texture. Cilantro microgreens deliver that familiar, bright cilantro taste, ideal for Mexican or Asian-inspired dishes. Basil microgreens taste like basil – a wonderful addition to Italian cuisine.
Mustard microgreens have a strong, pungent flavor. Kale microgreens have a slightly earthy and robust taste. Arugula microgreens offer a peppery, slightly bitter flavor. Beet microgreens are earthy and slightly sweet. Try a few different varieties to find your favorites.
Flavor intensity can vary depending on growing conditions, but these are general guidelines. Considering flavor profiles allows you to incorporate microgreens into dishes in a way that complements other ingredients. They aren't just 'healthy' – they can be genuinely delicious.
Growing Your Own: A Beginner's Guide
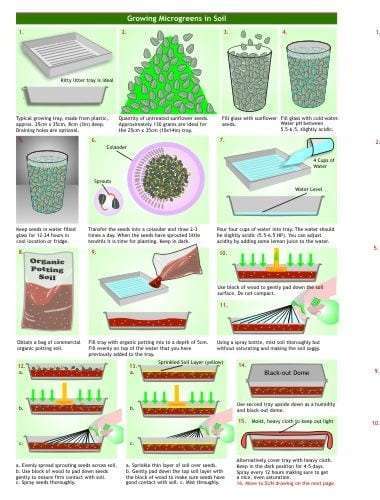
Growing microgreens is easy and doesn’t require a lot of space or equipment. You’ll need seeds (choose organic when possible), a shallow tray with drainage holes, a growing medium (like coconut coir or seed starting mix), a spray bottle, and a light source. Many people start with a simple 10x20 inch tray.
First, soak your seeds for 8-24 hours (check specific seed instructions, as this varies). Then, spread a layer of your growing medium into the tray, moisten it thoroughly, and sprinkle the seeds evenly over the surface. Gently press the seeds into the medium, but don’t bury them too deeply. Mist the seeds with water to keep them moist.
Cover the tray with a lid or plastic wrap to create a humid environment. Place the tray in a well-lit location, but avoid direct sunlight. A grow light is ideal, but a sunny windowsill can work. Keep the growing medium consistently moist, misting it several times a day. After a few days, seeds will germinate and the first leaves will appear.
Once the microgreens have developed their first true leaves, remove the cover and continue to mist them as needed. Harvest the microgreens when they’re about 1-3 inches tall, using scissors to cut them just above the soil line. Common mistakes include overwatering, which can lead
- Step 1: Soak seeds.
- Step 2: Prepare tray and growing medium.
- Step 3: Sprinkle and press seeds.
- Step 4: Mist and cover.
- Step 5: Provide light and moisture.
- Step 6: Harvest!
Microgreens on the Menu: Culinary Uses
The beauty of microgreens is their versatility. They can be used in so many ways to add flavor, texture, and nutrition to your meals. The simplest way is to add them to salads – they’re a fantastic alternative to lettuce. Sprinkle them on sandwiches or wraps for a boost of freshness and flavor.
Microgreens also work wonderfully in smoothies, adding a subtle vegetal note and a concentrated dose of nutrients. They can be used as a garnish for soups, stews, and omelets. For a more creative approach, try making a microgreen pesto – it’s a delicious and healthy twist on the classic Italian sauce.
Their delicate flavors complement various cuisines. Radish microgreens pair well with Asian-inspired dishes, while basil microgreens are perfect for Italian cuisine. Sunflower microgreens can add a nutty flavor to Mexican dishes. Don’t be afraid to get creative and experiment with different combinations. I've used pea shoots in pasta dishes and they're amazing.
Sourcing and Storage: What to Look For
If you don’t have the time or space to grow your own, you can purchase microgreens from farmers markets, grocery stores, and online retailers. When buying microgreens, look for ones that are vibrant in color, with no signs of wilting or discoloration. Avoid any that look slimy or have an off-putting odor.
Proper storage is crucial for maximizing shelf life. Store microgreens in the refrigerator, loosely wrapped in a damp paper towel inside a container. This will help to keep them hydrated and prevent them from drying out. Generally, they’ll stay fresh for about 5-7 days. It’s important to be mindful of food safety, as with any fresh produce.
Always wash microgreens thoroughly before eating them, even if the packaging says they’re pre-washed. While the risk of contamination is low, it’s always better to be safe. Look for suppliers who practice good hygiene and quality control measures. Buying locally from a trusted source is often the best option.
The 2026 Outlook: Trends and Predictions
The microgreen trend is likely to continue evolving in the coming years. We’re already seeing innovations in growing techniques, such as vertical farming and hydroponics, which allow for more efficient and sustainable production. These methods could potentially lower costs and increase availability.
I anticipate we’ll see the development of new microgreen varieties, catering to a wider range of tastes and nutritional needs. Perhaps varieties bred for even higher concentrations of specific nutrients. There’s also potential for microgreens to become more integrated into mainstream food systems, appearing in more pre-packaged salads and meal kits.
Accessibility is key. As production methods become more efficient, and demand continues to grow, I believe microgreens will become more affordable and readily available to consumers. While I’m not sure about specific predictions, I'm optimistic about the future of microgreens and their role in promoting healthy eating.


No comments yet. Be the first to share your thoughts!